Garrattfan's Modelrailroading Pages

Articles
Copper plating white metal parts
|
Dutch steam locomotives were fitted with a copper crown on the stack before WWII. The stack supplied by DJH ModelLoco with its NS7000 kit is just an ordinary white metal one. I've seen several completed loco's on layouts with a stack rim colored with copper paint. A fast and easy way to suggest a copper crown but not even close to real copper. It took me some time to figure out how to make a copper crown. Okay, I could turn an entire new stack from brass, but I don't have a lathe. And I did put honor in solving the problem on my own. Before long I got the idea to copper plate the stack. I am a chemist by education, long, long ago. I knew I could use electrolysis to add a thin layer of copper to the stack. Remember electrolysis? Second grade chemistry? Periodic table of the elements? I will save you the technical details. It comes down to this. Copper in a watery solution tends to deposit on white metal hanging in that solution. You'll need a little DC to stimulate this process, the solid copper on the positive pole will solve in the water, will cross the watery solution and settle on the white metal on the negative pole and will form a thin layer of copper there. The first exercise for the beginner chemist is the making of a useable copper solution. I've been browsing the internet for suitable copper salts, but they are hard to get for private individuals, not so much from their nature as from their quantity, what on earth would I need 5 kg copper sulphate for? Moreover a copper solution is easily home made, so why bother? An old DC transformer, copper wire and a key ring will suffice. Attach |
the key ring to the minus pole, the copper wire to the plus pole, hang them in a glass and add distilled water. Add a little household acetic acid (usually 8% solution) for electric conductivity. Open the transformer to about 5V and wait for an hour. The solution will have turned blue: solved copper in the water!! Tips
Having a clear blue solution, you can turn your attention to your work piece. It is of importance to prepare your work pieces well.
|
|
Attach your work piece to the minus pole, hang the copper wire and the work piece in the copper solution and put some 5 Volts on it. It need'nt be exactly that but too much voltage will overdo the process and the copper layer will not attach to the white metal. |
 |
Small bubbles will form on the surface of the white metal. Tap the work piece carefully and regularly to remove them so as not to obstruct the formation of the copper layer. Your work piece will turn black. Rest assured! That is copper in crystalline form depositing on the surface. When it all turns black, take your work piece out and wipe it off with a piece kitchen paper soaked in the afore mentioned household acetic acid. Avoid touching the work piece with your skin so as not to regrease the surface. Hang your work piece and wait. Repeat this procedure again and again and already after a few times you will see a faint translucent copper shine appear. Repeat the procedure until you are satisfied with a convincing copper color. |
|
 |
 |
 |
Brush up your work piece with a silver polishing cloth. If the copper layer was thick enough you won't see the white metal shining through and you'll be greeted by a heartwarming copper shine. If not, clean and degrease the work piece and continue the copper plating process. |
Principally there are no objections why you shouldn't copper plate an entire model but polishing it up might just be too much a tedious job.
Have fun copper plating parts of your kit and please do inform me about results you achieve!! |
|
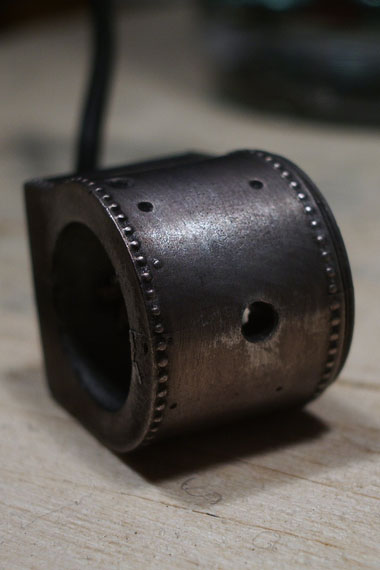 The smokebox after copper plating, but before polishing with a silver polishing cloth |
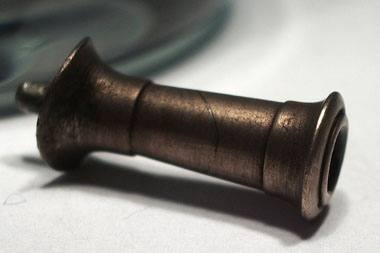
 And after polishing with a cloth |
 Final result of copper plating the stack and polishing the dome and bell |
|


Sign my
GuestBook